

Recently I've been getting emails asking about holiday card designs (I know, I know, it's only September.... But thinking about these things ahead of time is ALWAYS a good idea!). That said, I thought it would be fun to post a DIY tutorial on how to create some fun, custom Holiday cards for you and your family! These are really cute because they look like a present packaged up nicely with a personalized tag to each recipient. Fun, right? Here's what you'll need...
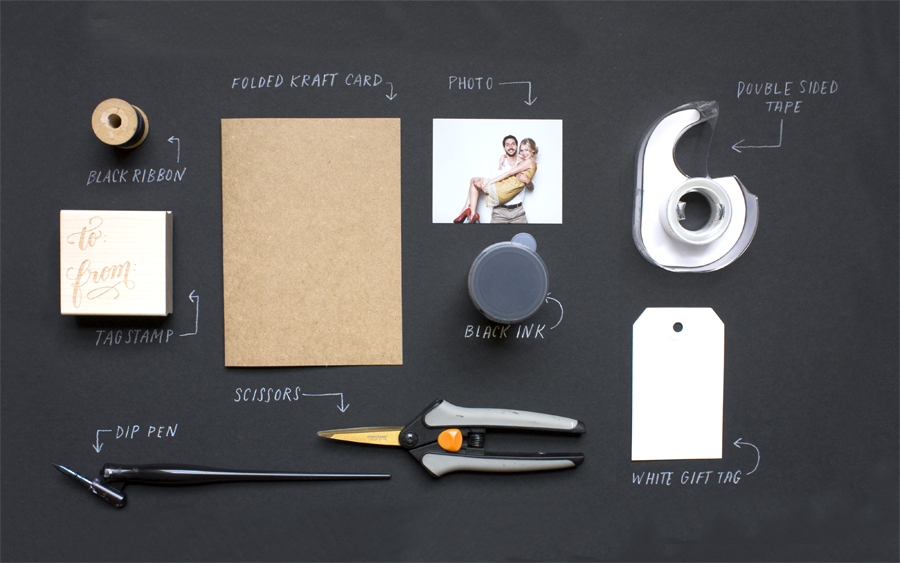
SUPPLIES:
• A cute family photo
• Scissors
• Double Sided Tape

STEP ONE:
On what will be the inside of your card, adhere your photo with the double-sided tape so it is centered and slightly placed towards the top.
Write out a personalized note to the recipient under your photo with either your dip pen and black ink or your ball point pen and black ink.

STEP TWO:
Close your card to reveal the outside front.
Use your To and From Tag stamp and black ink pad to stamp your white gift tag.

STEP THREE:
Tie your card together as if it were a present (it kinda is, though!).
Adorn with your freshly stamped tag to complete the 'gift' look.

You're all finished! Now, stick 'em in an envelope, address, and ship! For outer envelope calligrapher service, feel free to shoot me a message... with plenty of time to spare before the holidays, of course ;-)
can't thank you enough for this PERFECT holiday gift (card) idea! it's so my style and i love how it's a GIFT given - especially since i send out holiday cards to a lot of people that i don't actually give gifts to and also don't see that often - so this IS their gift from us! i love that! definitely doing it, but i better get started now since i dont know how to do true calligraphy and will need to fake it on every.single.card. oy.
ReplyDeletePretty penmanship goes a long way =) Even pairing a regular handwritten style goes well with the stamped gift tag! I'd love to see how yours turns out =)
Deletethanks for the suggestion, molly! i think i may have to do a simpler version of the to/from tag to speed it up a bit. i will be sure to email you and show you after i do a prototype! i love that this will be cheaper than ordering personalized cards, too! also really appreciate that you provided links for the supplies needed.
Deletewell it's been a few months, but my christmas cards are done and i've followed through! i'm about to send you a picture of the card i created - inspired by this post! thanks so much!
Deletethat's so simple and lovely!
ReplyDeleteHi Molly - love this! Do you mind letting us know what nib you used?
ReplyDeleteI used an oblique pen holder with a gillott 404 nib =)
ReplyDeleteThis is such a creative idea for holiday cards!
ReplyDelete